Dropper seat posts have become a must-have for mountain bikers in the last few years – and for good
reason!
Allowing you to easily adjust the height of your saddle as you ride, dropper posts have lots of
benefits
and are a great upgrade for any mountain bike.
But how exactly does a dropper post work, what post will fit your bike, and how do you fit a dropper
post? This guide has everything you need to know.
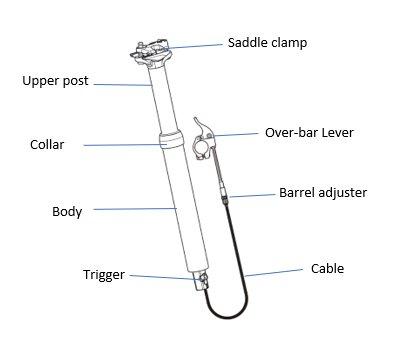
What is a dropper seat post?
Dropper seat posts allow you to drop your saddle height while riding through a remote lever on the
handlebars.
The result? On descents you can quickly shift your weight around allowing for more control, better
pumping technique and, ultimately, bigger and better shredding! Then, with a flick of the
bar-mounted
lever, you can bring the post back to a higher position ready for any climbing – even if only for a
few
pedal strokes before dropping back into a descent.
Having a dropper post can make a big difference when out on the trails, and they’re so popular that
the
technology can also be found on adventure and gravel bikes.
What dropper post should I get for my bike?
A dropper post can be a great upgrade for any mountain bike, but it’s important to find one that’s
compatible with your bike. Here’s a few things you’ll need to consider:
Seat post width - you will need to identify the width of your existing seat post as this is the
size
you will need when choosing a dropper. The size of your current seat post will be etched onto
the
post towards the bottom. The most common size is 31.6mm and is used on the majority of Boardman, Voodoo and Carrera mountain
bikes. If you are struggling to find this, you can
consult your owner’s manual or the specifications online.
Travel – next, you need to choose how much drop (travel) you want. Travel ranges differ but
common
measurements are 125mm or 150mm. You want the most travel that your bike can accommodate - the
more
travel, the lower you can drop the seat post. To find out how much room you have, measure how
much
your current seat post projects above the frame and then take 30mm off that measurement (to
account
for the collar on a dropper post). This will give you a good estimate of the maximum amount of
travel you could use.
Next, you need to ensure that the body of the dropper can fit all the way into your seat tube
before
either reaching a bend in the post or hitting the bottle bolts. One way to check if there are
any
obstructions is to push your original seat post all the way down and measure how far it can go.
When you’ve tested all of the above, select the largest dropper that will fit inside your frame
that
doesn’t exceed the extension of your current seat post.
How to install a dropper seat post
Once you’ve found the perfect dropper post, it’s time to install it.
The following step-by-step guide looks specifically at how to install dropper posts who’s cables run from
the bottom of the post through the seat tube – such as the Satori Pro. We’ll be looking at the most
common frame design for this, where there is an oval cut-out towards the bottom of the seat tube for the
cable to be fed through.
Tools required
To fit a dropper seat post you will need the following tools:
Allen keys
Assembly compound (carbon-safe for carbon frames)
Cable cutters
Allow plenty of time as certain elements of the job can be technical and most first-time dropper
installations take 30-60 minutes.
Before starting
Neatly lay out your tools and find an open, well-lit area to work in. Read through the full guide before
you begin and if you don’t feel confident, why not let one of our expert technicians take care of the
job for you? You can find your local Halfords store here.
Mounting the Lever
To start, you need to mount the lever that operates the post.
This will be operated using your left thumb and you need to find a position on the left side of the
handlebars that feels comfortable – so make sure you test it out. Typically, under-bar levers are
mounted to the right of the brake and over-bar levers to the left.
Once you’re happy, securely fasten the lever.
Routing the outer cable
It’s now time to route the outer cable, here’s how:
Working from the lever backwards, route the outer cable to the right side of the headtube and down
the downtube using the cable mounting points.
Route the cable under the bottom bracket and back up the rear of the seat tube and into the dropper
routing hole. Before continuing, check the cable has good clearance from the rear tyre and cranks
and reposition if required.
Feed the cable through the seat post routing hole until the cable is roughly in line with where the
bottom of your dropper will sit.
Moving back to the front of the bike, you can now shorten the outer cable to the correct length. Cut
it so that you can easily turn the handlebars side to side.
PRO TIP: be generous with your cable length as it may shorten
when you make your final position adjustments to the post.
To prepare for the next step, you now need to feed the cable towards the back of the bike so that
the cable pops out of the top of the seat tube. Now is a good time to install the ferrules onto your
outer cable with a small amount of waterproof grease.
Feeding your inner cable
With the outer cable correctly routed, it’s time to feed the inner cable through.
First, clean the cable with GT85 or wet lube and wipe it down.
Some droppers require you to feed the inner cable from the lever and some feed from the post, so
check the manual provided with your dropper before continuing.
If your cable feeds from the seat post, you may need to slide a barrel nut onto your inner cable
first - again consult the manual.
Once you’ve fed you inner cable into place, you’ll need to fasten it. This is done with a grub
screw, and you need to make sure it’s firmly fastened. Top
tip: make sure the outer cable is correctly seated at both the lever and dropper end
otherwise your cable will go slack when it does drop into place.
Tensioning your cable
With the cables in place, they need to be correctly tensioned.
Press the lever and check that the trigger on the bottom of the post is being pulled. If the lever feels
loose, you may need to loosen the grub screw and pull through some more inner cable.
Once you are happy that the lever is operating the trigger correctly, you can use the barrel adjuster
(rotating counter-clockwise to tighten) to fine-tune the cable tension. You want to remove any slack
from the cable so that as soon as you press the lever, the trigger starts moving.
Positioning your seat post
We’re nearly there, now all that’s left to do is position the seat post.
Start by lowering your dropper seat post into position. It’s important to guide the cable through
the routing hole at the bottom of the seat tube as you do this (you don’t want the cable to become
unseated from the correct position on the bottom of your post!).
Position the dropper so that, when it’s at its maximum length, your leg has a slight bend in it -
this will help to optimise your set-up for climbing.
Now that everything is in the correct position, tighten your seat clamp and do a final check of the
cable making sure you are happy with the routing and that everything is correctly seated.
Finally, check that the dropper is working correctly. If the seat post doesn’t stay up, the trigger
is likely being pulled all the time – use the barrel adjuster (rotating clockwise) to slacken the
inner cable until the seat post holds firmly in place.
And that’s it! Your dropper is fitted. Hopefully you’ve left enough time in the day to go
and test it out on the trails, and trust us, you’ll never want to ride without one again!
Remember, for that added peace of mind, you can also let one of our experts fit your new dropper post for
you. Discover more here.
And don’t forget to explore our range of dropper seat posts over at Halfords.com.